
4.1.61-x

2026-06-29 | 4.1.61-1 POS

The information provided below includes the user experience, process workflow, and infrastructure improvements and updates for this production version of POS API and UI.

Refer to change tickets: CHANGE-14782, CHANGE-14862, CHANGE-14926, CHANGE-14985, CHANGE-15052, CHANGE-15104, CHANGE-15153, CHANGE-15179, CHANGE-15200, CHANGE-15247, and CHANGE-15341 when speaking with a team member about this release.

New Features

PRMA-4163, POS-5336

Age Restricted Products

Restrict purchase of specific products by age. Optionally prompt POS user to ask customer for ID and verify their birthdate when specific products are added to an order.

Data Management Settings

From the Availability → Restriction Age section of Product List and Modifier List, define the following:

  • Restrict Age - Restrict the purchase of this product by age

  • Age Value - Minimum age to purchase this product

From the Ordering Application → Ordering → Age Restriction section of Company/Site Preferences, define the following:

  • Age Verification Method - Select the preferred method to verify age when age restricted products are added to an order.

PRMA-4608, POS-56309, POS-56781, POS-56782

Barcode Support for Weighed Products

Genius POS now supports UPC Type 2 barcodes, which are used to create product labels that POS users can scan to add the embedded Price or Weight to an order.

PRMA-6498, POS-55577, POS-55578, POS-55854, POS-56193, POS-56617

Loyalty Functions on Customer Facing Display

Gift and Loyalty integrates with Customer Facing Displays (CFD). This enables the customer to engage with their Loyalty account from a CFD independent of the order entry process improving speed of service.

  • Sign Up for Loyalty

  • Login to Loyalty

  • View and Redeem Rewards

Data Management Setting

  • Enable Allow Loyalty On OCB from the Peripheral Configuration section of the OCB peripheral.

Digital Menu Board Configuration

The Loyalty component is fully integrated with the point of sale (POS) data feed and adapts automatically based on configured loyalty settings and available identification methods.

For configuration instructions:

PRMA-6959, POS-55246, POS-55795, POS-55796

Loyalty and Online Ordering

Gift and Loyalty integrates with Online Ordering. The POS user can check in, resume, cancel, or void Open orders associated with a Loyalty customer from Loyalty Lookup.

Data Management Settings

From the Loyalty → General Loyalty Settings section of Company/Site Preferences, define the following:

  • Lookup Open Orders on Loyalty Scan - When a Loyalty customer is identified, the POS displays all Open orders for that customer enabling the user to select an order and resume it.

    When toggled On, define the following:

    • Order Lane - Select the Order Lane to use for order lookup.

From the Ordering Application → Ordering section of Company/Site Preferences, define the following:

  • Postpone Order Creation - Do NOT automatically create New Order after following actions:

    • Identify Loyalty Customer / Add Customer to Order

    • Save Order Information

    Disabling this setting allows the POS user to select an existing Online Order associated with the Customer Loyalty account without creating a New Order.

PRMA-7189, POS-1533, POS-40614, POS-56909, POS-56911, POS-56912

Check In Online Orders from Drive-Thru

From an Open Orders view, POS users can lookup and Check In Online Orders. The Check In process supports Paid, Unpaid, and fully discounted orders.

Improvements

POS-47328, POS-56310

Receipt Templates

Updated receipt template configuration to:

  • Ensure gift card account number is masked on printed receipt as expected

  • Properly apply and print currency rounding adjustments

POS-56520

End of Day (EOD)

Prevent EOD from running during an active Split Order session.

POS-56560

Auto Logon

Technical improvement to Post EOD and Data Sync to ensure Auto Logon function is persisted as configured.

POS-56691

Modifier Groups

Technical improvement to Refresh Data on iOS to ensure Modifier Groups marked inactive in Data Management are not active at the POS.

POS-56698

Customer Loyalty Rewards

To support internal Loyalty provider reports, POS now saves the external reference ID provided by Gift and Loyalty with the offer/reward.

POS-56809

Virtual Keyboard

Regardless of Shell screen setting, all Virtual Keyboard keys remain in their expected location.

POS-56827

Light / Dark Theme

When Dark theme is active, the POS Signature screen displays the signature in high-contrast white for optimal visibility.

POS-57009

Gift Cards

Technical improvement to SVS Gift Card functions when scanning card using MSR device.

POS-57064

Split Modify

Split Modify function is applicable to a specified quantity of a bundle component.

POS-57080

Table Number Assignment

Technical improvement to default table assignment if order destination does not require table selection.

POS-57081

Handheld Device

Technical improvement to display popup menu with full descriptions when user selects product from menu on handheld device.

POS-57091

Order Numbers

Technical improvement to address orders incorrectly marked as active and sent to the cloud without a valid Order ID.

POS-57142

Convert Item

Technical improvement to address missing order_item_id of child items when converting item with default build with quantifiable modifiers.

POS-57176

Android Technical Improvement

Product Options popup remains open as expected after user releases finger from long-press on product menus.

POS-57212

Installation

Technical improvement to upgrade POS/Shell on Moby device.

POS-57258

Expo Numbers

Technical improvement to ensure Expo Numbers are generated for every order regardless of Create Expo Number preference.

POS-57467

Floating Cash Drawers

User is prompted to resume floated cash drawer as expected after floating drawer and returning to order entry.

POS-57482

Logging

Implemented additional logging for employee drawer session events.

POS-57546

Device ID Logging

Technical improvement to use device UUID generated from Shell as context device ID in log messages.

POS-57600

Network Connectivity

Technical improvement to add fallback URL in case primary Heartbeat service is unreachable.

PRMA-5487, POS-49573

Discounts

When a Minimum Order Subtotal is defined for a discount, you can optionally exclude the price of discounted items from the subtotal when determining if an order meets the minimum subtotal qualification.

Data Management Configuration

From the Rules page of Discounts List, define the following for the discount:

  • Exclude Discounted Items Amount - When calculating the subtotal to determine if an order qualifies for the discount, exclude discounted items from the subtotal calculation.

This setting is only available when:

  • The Minimum Order Subtotal on the Rules page is set to a value greater than zero (0) for one or more sites.

  • The Apply Criteria → Apply Type for the discount is set to Item(s).

PRMA-6646, POS-54223, POS-55669

Order Source Management

Order Source Management enables permissioned users to pause delivery partner integrations and remote channels for a specific amount of time.

Updated POS to maintain status of Order Sources via XPL messages.

PRMA-7007, POS-56354, POS-56646, POS-56653

Handheld for TSR and Suite Catering

Table Service Restaurant (TSR) and Suite Catering functions are now supported on Handheld Devices.

  • App automatically manages internal insets and scrolling regions based on device constraints, ensuring UI content is not obstructed

  • Removed independent scrolling from Tender buttons

Genius POS now supports UPC Type 2 barcodes, which are used to create product labels that POS users can scan to add the embedded Price or Weight to an order.

Select Barcode Format

From Company/Site Preferences in Data Management, select the preferred format for product barcode scanning.

Locate the General → Barcode Format section of Company/Site Preferences:
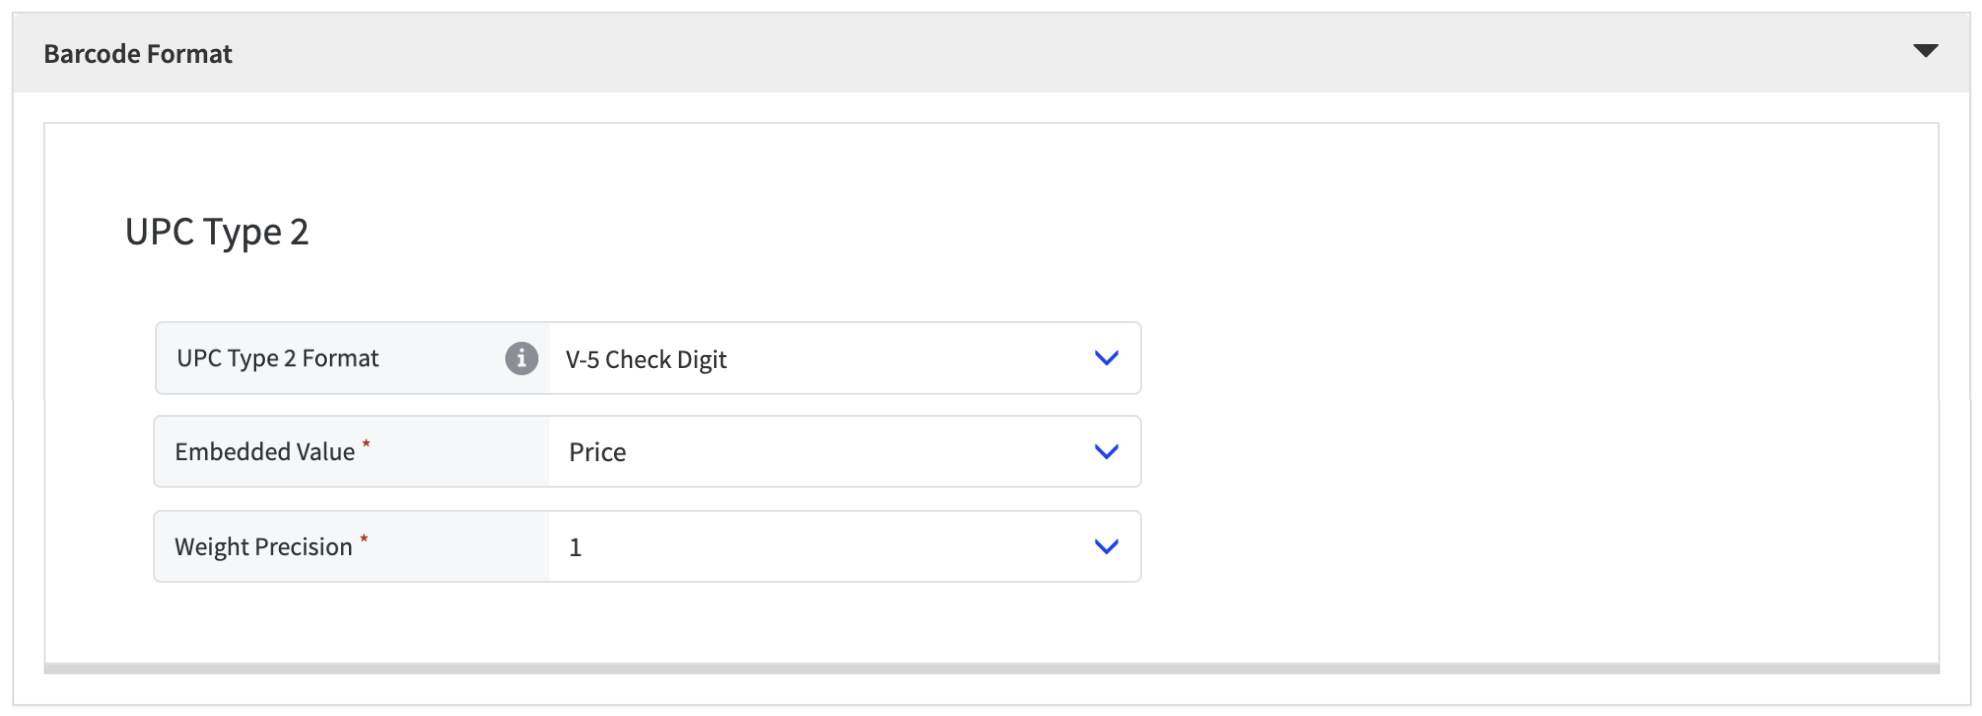
n-pos-barcode-format.png

From the UPC Type 2 Format dropdown, select the preferred barcode format:

Format

Description

None

Do NOT use UPC Type 2 barcode.

5-Digit Value

Barcode begins with '02' or '2' followed by Product ID, then embedded Price or Weight.

Define the following:

  • Embedded Value - Select the applicable value to embed in the barcode: Price or Weight

  • Weight Precision - Specify the number of decimals to use for weight values.

V-5 Check Digit

Barcode begins with '02' or '2' followed by Product ID, and embedded Price or Weight. A 7th digit is randomly generated.

Define the following:

  • Embedded Value - Select the applicable value to embed in the barcode: Price or Weight

  • Weight Precision - Specify the number of decimals to use for weight values.

Flag + 4-Digit Value

Barcode begins with '02' or '2' followed by Flag that indicates if the embedded value is Price or Weight:

  • When Flag is 0, the value is Weight.

  • When Flag is greater than 0, the value is Price.

Set Up Product

From Product List in Data Management, set up a product for UPC Type 2 barcode scanning:

  • Add 5-digit PLU to match barcode

  • Enable weight capture

To add the product PLU:

From the Alternate PLUs section of the General page, select Create to add a 5-digit PLU that matches the barcode.
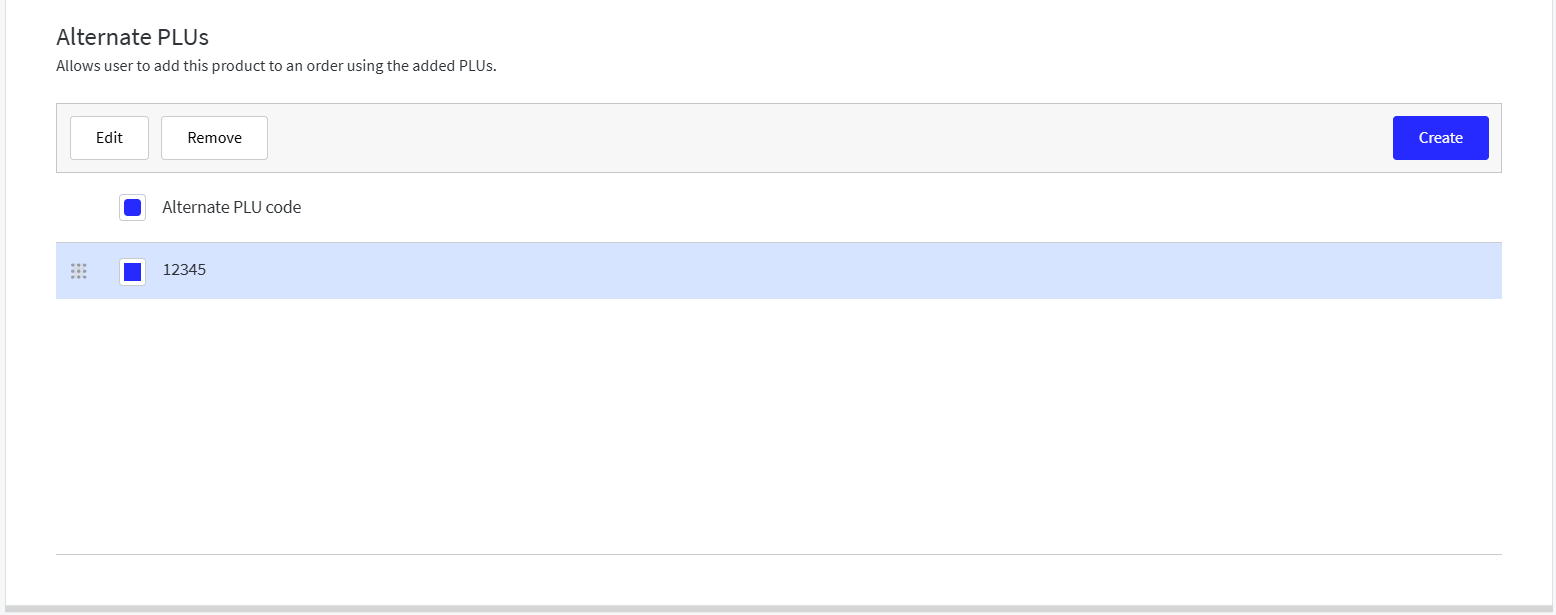
n-pos-alternate-plu.png

To enable weight capture:

From the Weight page, toggle Capture Weight to On and select the applicable Weight Format.
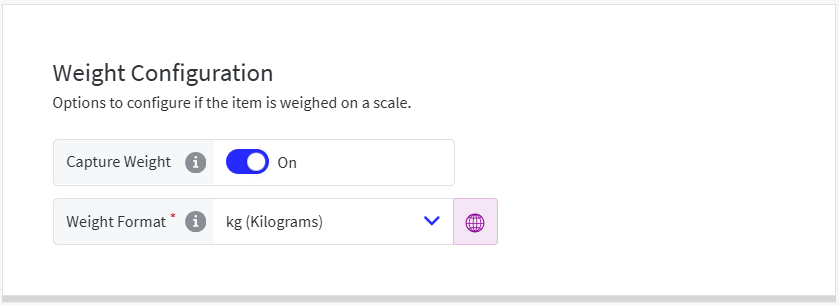
n-pos-enable-product-weight.png

Note

For more information about Product List, see Create Product.

From an Open Orders view, POS users can lookup and Check In Online Orders. The Check In process supports Paid, Unpaid, and fully discounted orders.

To Check In Paid Orders:

  1. From an Open Orders view, select Check In next to the order.

  2. If a destination is not already assigned, select the appropriate destination:

    n-pos-select-destination.png

To Check In Unpaid Orders:

  1. From an Open Orders view, select Pay next to the order.

  2. If a destination is not already assigned, select the appropriate destination:

  3. From the Tender screen, apply payment.

Destination Assignment Method

From Data Management, set the preferred order destination assignment method at the company, site, and terminal level.

Company/Site Preferences

From the Ordering Application → Ordering section of Company/Site Preferences, define the following:

n-pos-destination-assignment-method-for-checked-in-orders.png
  • Destination Assignment Method for Checked In Orders - Select the method in which POS users assign an order destination to online orders on check-in:

    • Automatic Assignment - Automatically assign the default order destination selected for the terminal scheme

    • Manual Assignment - POS user selects the order destination

When Manual Assignment is selected, add the order destinations to make available to the user from Available Destinations for Checked In Mobile Orders.

In the example above, the Carry Out and Drive Thru destinations are added.

Define the list of available destinations from Online Ordering Settings.Online Ordering Settings

Terminal Scheme Setup

From the Order Entry → Destinations section of Terminal Scheme, define the following:

n-pos-destination-assignment-method.png
  • Destination Assignment Method - Select the method in which POS users assign an order destination to online orders on check-in:

    • Automatic Assignment - Automatically assign the default order destination selected for the terminal scheme

    • Manual Assignment - POS user selects the order destination

    • Inherit Site Settings - Apply the default option defined at the site-level

When Manual Assignment is selected, add the order destinations to make available to the user from Available Destinations for Checked In Mobile Orders.

In the example above, the Carry Out and Drive Thru destinations are added.

Queue Time

Queue Time tracks the time when a customer joins the queue. The following describes how to set up Queue Time to ensure orders in the POS and Kitchen Management queues are sorted consistently.

Order Destination Setup

Use Order Destinations in Data Management to:

  • Configure Queue Time for each order destination

  • Allow Queue Time by Order Source

From the General section of Order Destinations, define the following:

n-pos-destination-queue-time.png

Set Queue Time

Track the "queue time" of an order to determine how long the order is waiting in the queue.

From the dropdown, select the order state that determines when the queue time for this order destination starts:

  • Never - Do NOT start queue time

  • Check In - Start queue time on check-in

  • Create - Start queue time when user creates order

  • First Item Add - Start queue time when first item is added to order

  • First Order Save - Start queue time when order is first saved

  • Set Destination - Start queue time when order destination is selected for order

Allow Queue Time By Order Source

Toggle On to set the queue time for the order destination based on order source.

Queue Time by Order Source

When Allow Queue Time By Order Source is toggled On, add order sources for queue time:

  1. From the upper-right of Queue Time by Order Source, select Add Queue Time.

  2. From the Order Source dropdown, select the order source.

  3. From the Queue Time dropdown, select the order state that determines when the queue time for this order source starts.

    n-pos-add-queue-time-by-order-source.png
Order Lanes Sorting

Use Order Lanes in Data Management to define how orders are sorted in an Order Lane on Open Order Screens.

n-pos-lane-sorting-queue-time.png
  1. Open the Sorting Rules page of Order Lanes.

  2. From the Sorting Rules section, select Add Sort Rule.

  3. From the Key dropdown, select an order property to sort.

  4. From the Direction dropdown, select the sorting direction for the selected key.

    • Ascending - Sort the key alphabetically from A-Z.

    • Descending - Sort the key alphabetically from Z-A.

  5. From the lower-right of the Add Sort Rules window, select Apply.

  6. Select and drag the control to the left of the rules to sort them from highest-to-lowest (where the rule at the top has the highest rank).

  7. From the upper-right, select Save.

Kitchen Screen Sorting

Use Kitchen Screen Settings in Data Management to define sorting rules for orders on a kitchen screen.

n-pos-kitchen-screen-sorting.png
  1. Open the Sorting Rules page of Kitchen Screen Settings.

  2. From the Sorting Rules page, locate the Order Sorting Rules section.

  3. From the Sorting Rules field, select Custom.

  4. From the upper-right of Custom Sorting Rules, select Add Sort Options.

  5. From Add Sort Options, select the preferred order events to use when sorting orders on the kitchen screen.

    For example, select Queue Time to sort orders by their respective Queue Time from earliest to latest.

  6. From Custom Sorting Rules, select and drag the control to the left of the rules to set the priority (where the rule at the top has highest priority).

Queue Time Values

To define an alternate value for the Queue Time sort option:

n-pos-queue-time-values.png
  1. From the right of the Queue Time row, select the 3-dot menu.

  2. From the popup menu, select Edit Alternate Values.

  3. From the Alternate Value dropdown, select an alternate sorting criterion to use if the Queue Time sorting rule is not defined.

  4. From the lower-right of the Alternate Value window, select Add.