Site Manager
→ → →
Use Site Manager to:
View the status of displays and Content Layouts from Sites
Generate a Share Code to link content to devices from Sites
Configure Menu Engine from Sites
Manage Daypart Schedules for DMB content and synchronize site updates
Define Sleep Times for displays
Capture information about Business Attributes, preferences, and operational metrics to improve site management and performance
→ → →
The following is an overview of the Sites tab of Site Manager:
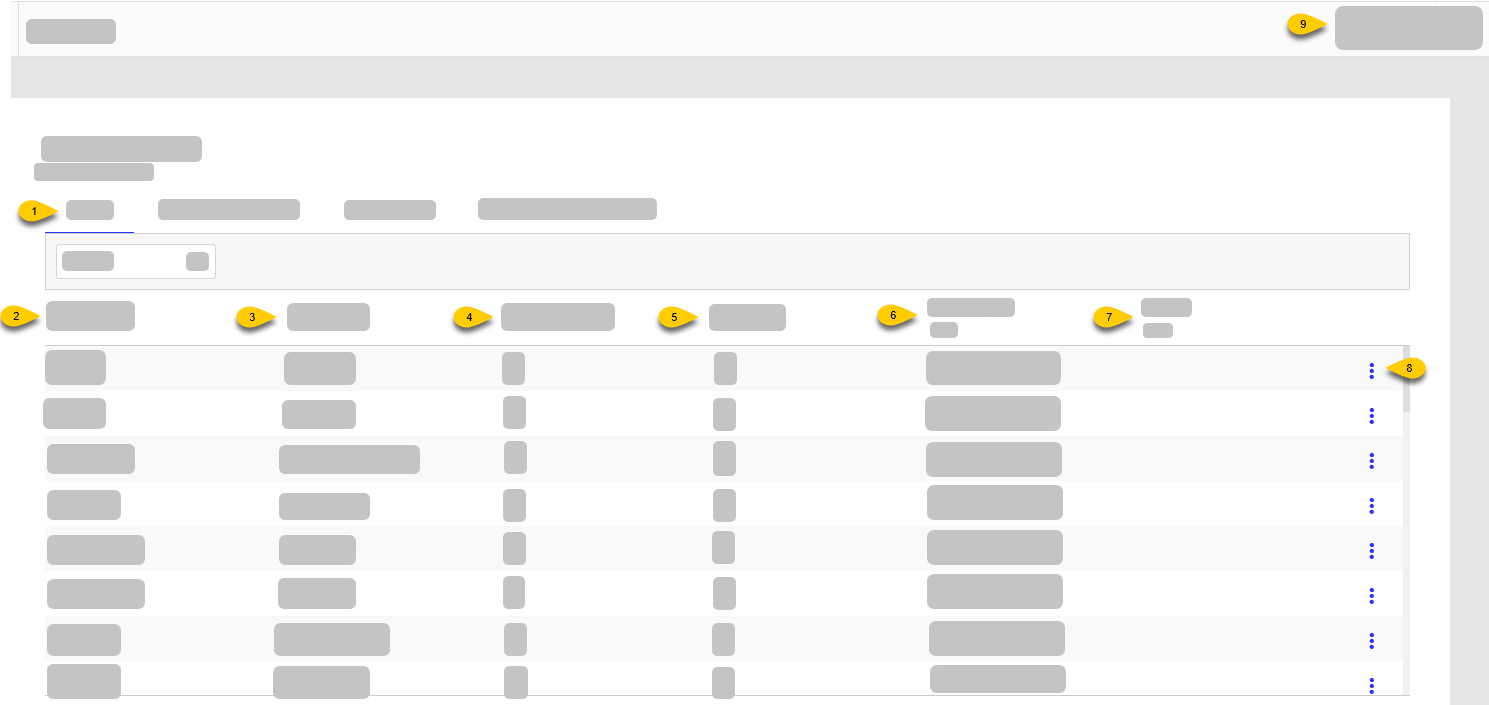 |
1 | Sites | Open the Sites tab of Site Manager |
2 | Site ID | ID assigned to site |
3 | Site Name | Name of site |
4 | Language | Default or preferred language for display text |
5 | Hierarchy | Site Hierarchy to which the site is assigned |
6 | Tag | Tags assigned to the site |
7 | Locale | Location of site |
8 | Content Layouts | Number of Content Layouts mapped to the site Select the Content Layouts value to view the list of mapped layouts. |
9 | Devices | Number of physical DMB devices used at the site |
10 | Configure and view the status of Menu Engine at the site | |
11 | Select the status for a specific site to view the current health of its connected device(s). Select the link below the Status column header to filter the site list by status indicator. | |
12 | 3-Dot Menu | From the dropdown, select an action to perform on the site:
|
13 | Select Sites | Open the Site Selector to select the sites to view. |
View Display Status
→ → →
To view the status of connected devices and display assignments:
From the Site Manager, select the Sites tab.
From the site list, locate the site.
From the Status column, select the status indicator. A sidebar opens that lists the layouts at the site.
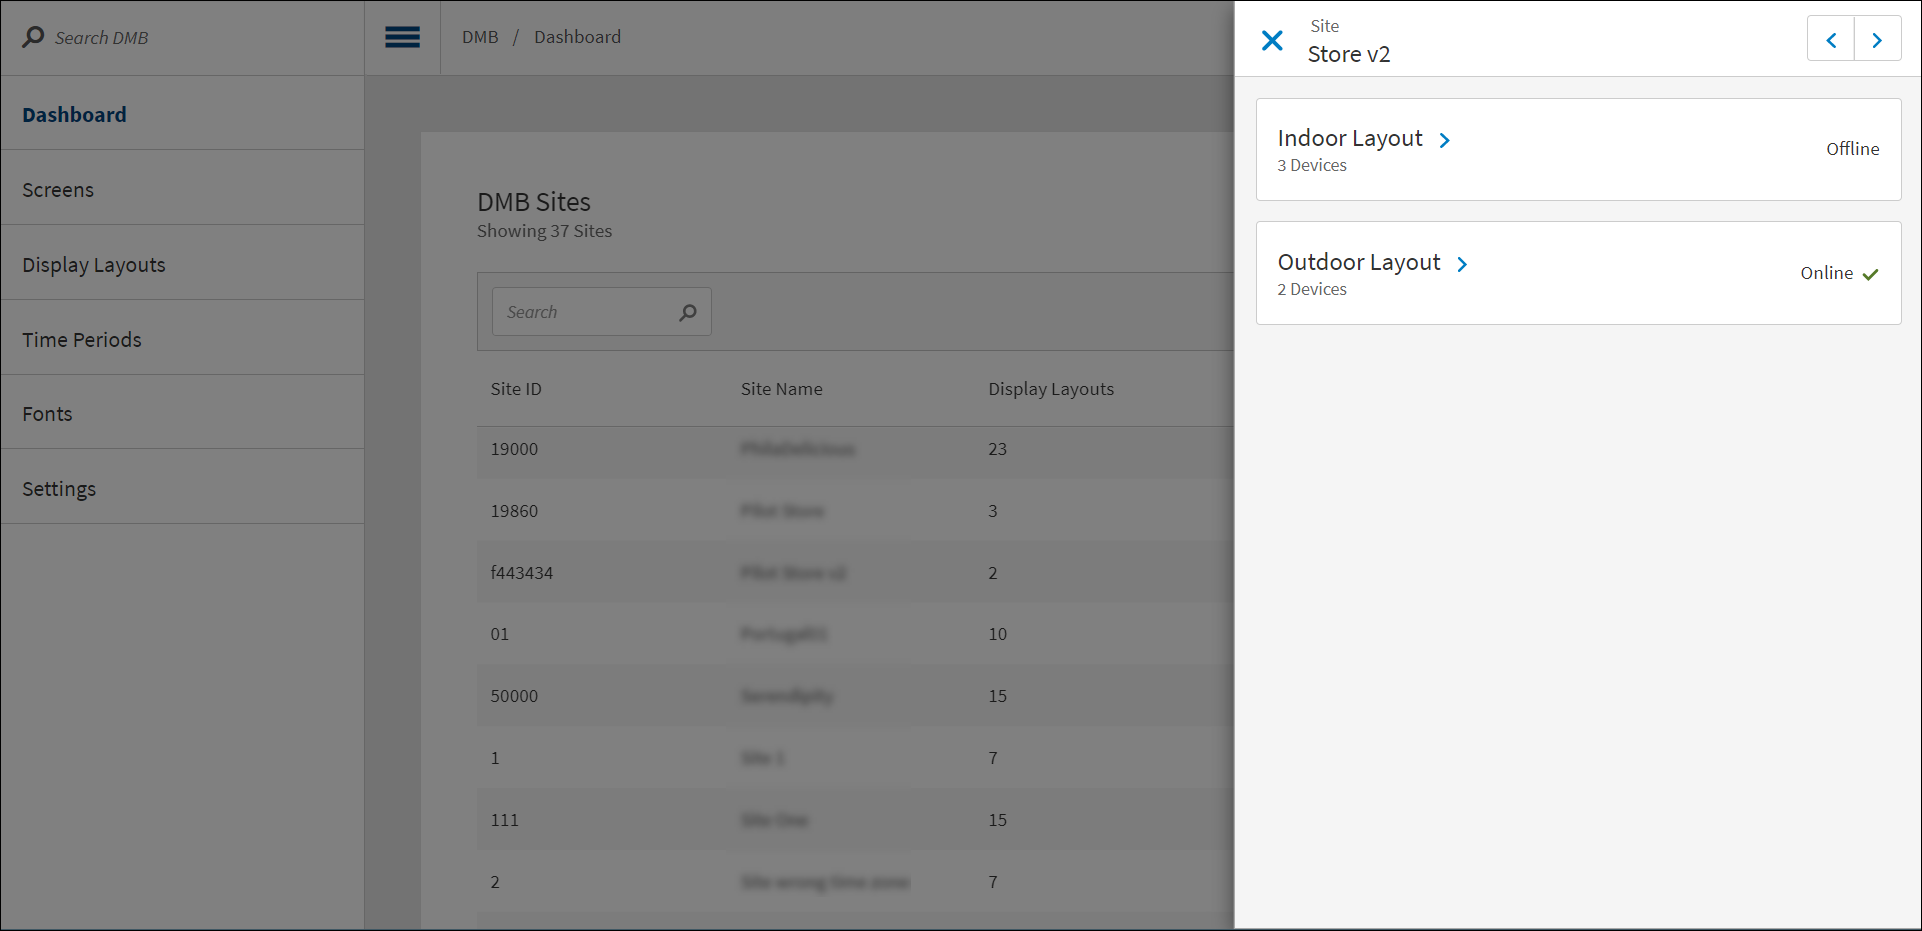
To the right of a layout name, select the right arrow to view details about connected devices, including:
Virtual representation of content displayed on device
Device name
Serial number
Deployment date/time
Status of device
From the details window, open the 3-dot menu to the right of a device to access the following functions:
Function
Description
More Information
View the telemetry and device health details.
From the left menu pane, select General to view:
Display information, including device status, display assignment, and current screen
Network information, including the connection type and IP address
Hardware information, including brand, model, and available disk space
Nota
Use the Distributor's API to define the frequency at which data is sent.
From the left menu pane, select Device Screenshots to access screenshots from the last seven (7) days.
Select the 3-dot menu to view and download a screenshot.
Reboot Device
Remotely reboot the device
Remove This Device
Remotely remove the device from layout
Take Screenshot
View screenshot of real-time display content
Virtual Preview
View virtual representation of display content
Generate Share Code
→ → →
A Share Code is a unique 5-digit code generated for a device at a site. A Share Code can only be used to link a device at one (1) site.
To generate a Share Code for a site:
From the site list on the Site Manager, locate the site.
From the row of the site, select the 3-dot menu.
From the popup menu, select Share Code to view the Share Code.
Share Codes are valid for 24 hours.
If the code is expired, select Refresh Code.
The Share Code function is disabled if a display layout is not assigned to the site.
From the Share Code window, select Close.
Non-Android users: See Link Device to Display Layout.
Android users: See Link Android Device to Display Layout.
Configure Menu Engine
→ → →
To view Menu Engine status:
From the Site Manager, select the Sites tab.
From the site list, locate the site.
From the Menu Engine column, view the site status.
From the All dropdown, select Configured or Not Configured sites.
For Not Configured sites, hover your cursor over the Menu Engine column to view configuration issues.
To reconfigure Menu Engine:
From the site list, locate the site.
From the 3-dot menu for the site, select Reconfigure Menu Engine.
→ → →
The following is an overview of the Daypart Schedule tab of Site Manager:
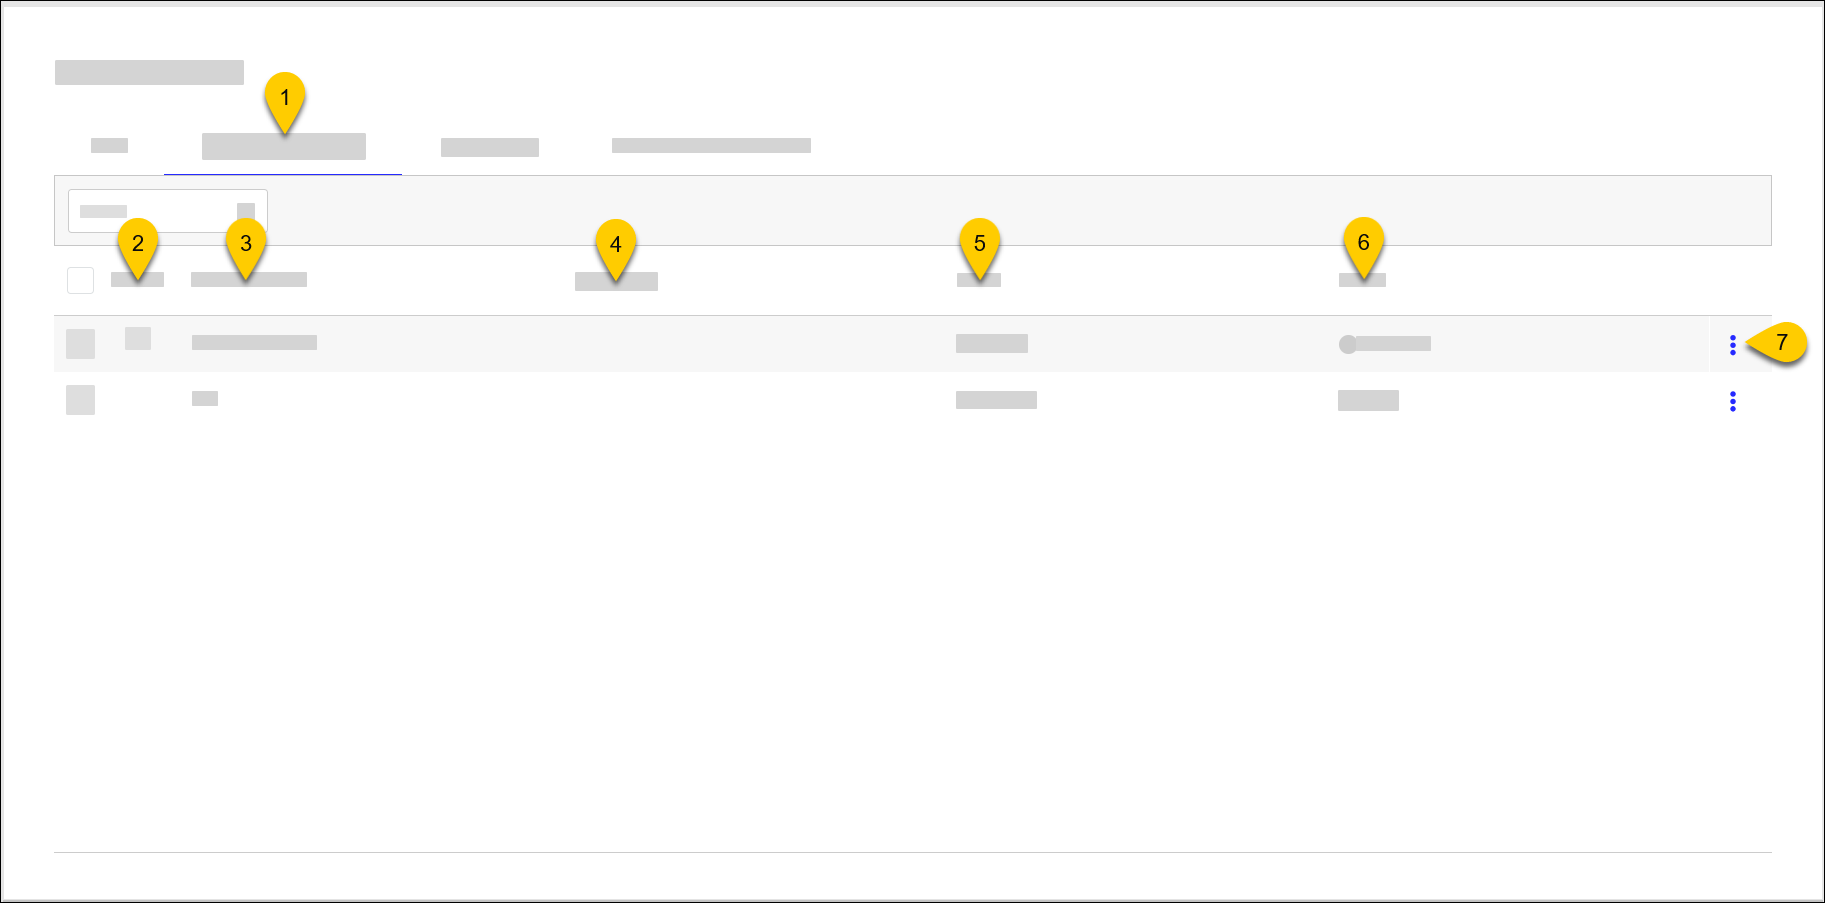 |
1 | Daypart Schedule | Open Daypart Schedule The number in the column header indicates the number of schedule changes that require synchronization. |
2 | Default | |
3 | Schedule Name | Name of schedule |
4 | Description | Description of schedule |
5 | In Use | Number of sites where the schedule is used To edit the active status for sites, select the link in this column. |
6 | Status | Status at sites where the schedule is used |
7 | 3-Dot Menu | From the dropdown, select an action to perform on the schedule:
|

→ → →
The following is an overview of the Display Sleep tab of Site Manager:
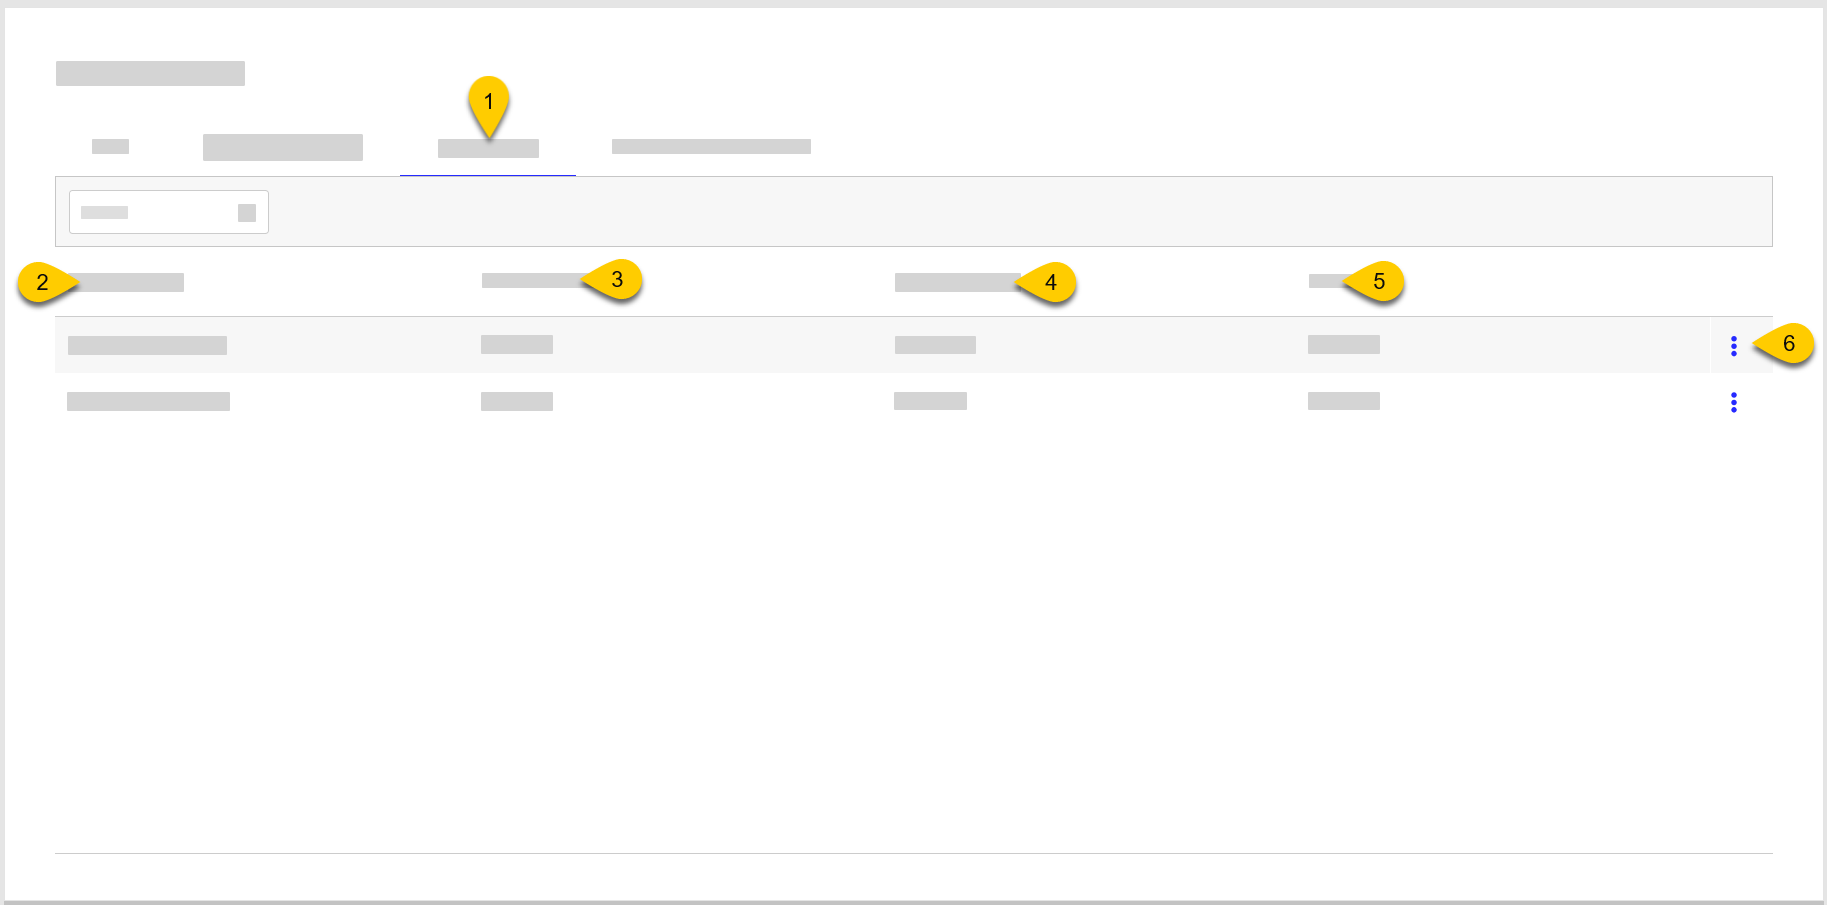 |
1 | Display Sleep | Open Display Sleep tab of Site Manager |
2 | Display Schema | Name of Display Schema |
3 | Number of Screens | Number of screens used in Display Schema |
4 | Sleep Configured | Number of sites where sleep intervals are configured |
5 | In Use | Number of sites where the schedule is used To edit the active status for sites, select the link in this column. |
6 | 3-Dot Menu | From the dropdown, select an action to perform on the schedule:
|
7 | Select Sites | Open the Site Selector to select the sites to view. |
Define Sleep Times
Nota
Recommended Sleep Time for DMB displays is 15-minutes before and after business hours.
→ → →
To configure a sleep schedule for a Display Schema:
From Site Manager, select the Display Sleep tab.
From the 3-Dot menu on the Display Schema row, select Edit.
From the Sleep Intervals screen, select +Add Sleep Interval.
Define the following settings:
Setting
Description
Start Day
Day when interval begins
Start Time
Time of day when interval begins
End Day
Day of week when interval ends
End Time
Time of day when interval ends
Interval Length
Length of interval
Active
Number of sites where the interval is active
To edit the active status for sites, select the link in this column.
From the upper-right of the screen, select Sync Sleep Time.
→ → →
To answer a business attribute:
From Site Manager, select Answer Business Attributes.
From Answer Business Attributes, select Business Attribute Set.
From the Business Attribute Set modal, change the value for the attribute:
From the Business Attribute Set modal, select the global icon for My First Selection and select the sites.
From the Site List, select Done.
Nota
Alternatively, a site can be selected from the Site Manager page by selecting the Select Sites dropdown, selecting the sites from the list, and selecting Select Site(s).
From the upper-right of the Business Attributes Set modal, select Save. The system updates the site data with the selected attribute answers.
Nota
If the Content Layout with content for a selected attribute answer is already deployed and running on a site, the content mapped to the selected answer is displayed on the device immediately.
If not, the content for the attribute is shown after the Content Layout deployment.